

Welcome to our latest blog!
If you’re like me and want to have most compact, cold, silent and energy efficient ESXi server at home, you probably looked at Intel NUC more than once 😉
I’m now upgrading (or rather downgrading?) my lovely 2U ESXi that built myself 2 years ago. It is still powerful, but I have no space for it. I will tell you why.
My server room is located under the stairs. It was filled with equipment – Cisco FTD 5506x firewall, Cisco 3560cx switch, Cisco WLC3504, Cisco 9120, 9130, 3x 3702 APs, 2U ESXi server and UPS battery ensuring my NFS storage is not corrupted in the event of a power cut.
All that boxes generated so much heat, that I have decided to make space for clothes airer – my washing was dry just 2-3 hours after putting it inside the server room 🙂 This space could also be used as sauna.
I then decided to simplify my home network and lab. Moved NAS to the cloud, virtualised firewall (chosen Untangle – amazingly sleek), mounted APs properly outside of the server room and switched to Mist.
Now I’m down to just an ESXi server, 1 small, passive, lovely Juniper EX2300-C-12P switch (that can be managed from Mist cloud!) and 2x Mist APs – AP41 and AP43. No more controllers, batteries, firewalls.
Do you see what my problem is?
To fix this, I will put a dehumidifier in that room. But I need more space to do it. This is why I wanted to switch to micro server (NUC) – so I can replace the rack with massive ESXi server with dehumidifier.
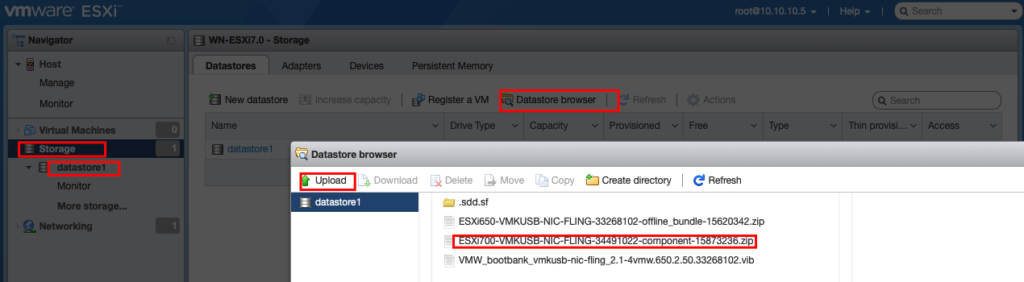
I ordered 10th Gen Intel NUC with 64GB of RAM and 2TB SSD – it’s more than enough to run my production and lab networks. But since I no longer have a physical firewall, I encountered a challenge – NUC has only one wired NIC card. I now needed two – one leg connected to BT fibre converter (WAN PPPoE) and one leg connected to the switch (LAN).
After putting ESXi 7.0 on my NUC (it was quite challenging – NUC Intel wired NIC is not supported by ESXi and it required adding Intel NIC drivers to the ESXi image – thank you Bernhard @WiFi_Burns for your help!), I realised that my USB NICs are not recognised when connected.
Additional drivers are required to make it work.
Since we WiFi nerds don’t use VMware excessively, I personally found instructions available from VMware quite confusing and difficult to follow, so I’ve decided to put all steps needed to make external USB network adapters work on Intel NUC running ESXi.

![vmware• ESXi-
O The service TSM-SSH was successfully started
- dismiss
Hardware
Hos
Monitor
5.] Virtual Machines
Storage
datastorel
Monitor
More storagem
Networking
System
Sta
Name
attestd
DCUI
lbtd
ntpd
Ljcensjng
Packages
ces
Stop Restart I
e Refresh
I Actions
Description
attestd
Direct Console UI
Load-Based Teaming Daemon
Active Directory Service
NTP Daemon
PC,'SC Smart Card Daemon
PTP Daemon
CIM Server
SNMP Server
ESXi Shell
v
sfcbd-watchdog
snmpd
Security & users
Status
Stopped
Running
Stopped
Running
Stopped
Stopped
Stopped
Stopped
Stopped
Stopped
Source
Base system
Base system
Base system
Base system
Base system
Base system
Base system
Base system
Base system
Base system](https://wifininjas.net/wp-content/uploads/2020/07/image-11-1024x455.png)
![ssh root@10.10.10.5 — -ssh -l root 10.10.10.5 — 123x4
[Password:
The time and date of this login have been sent to the system logs.
WARNING:
All commands run on the ESXi shell are logged and may be included in
support bundles. Do not provide passwords directly on the command line.
Most tools can prompt for secrets or accept them from standard input.
VMware offers supported, powerful system administration tools.
Please
see www.vmware.com/go/sysadmintools for details.
The Shell can be disabled by an administrative user. See the
vSphere Security documentation for more information.
[(root@WN-ESXi7:-]
[ [ root@WN
root@WN
[[root@WN
-ESXi7:-]
-ESXi7:-]
-ESXi7:-]](https://wifininjas.net/wp-content/uploads/2020/07/image-12.png)

![vmware ESXü
Navigator
Manage
Monitor
6] Wtual Machhes
Storage
WN-ESXi7.O
G) Get vCenterServer I b Create/Register VM I
I Refresh I
WN-ESXi7.O
Version:
Uptime:
7-0.0 (Build 15843807)
Maintenance Mode (not connected to any Center Server)
0.03 days](https://wifininjas.net/wp-content/uploads/2020/07/image-14-1024x243.png)
That’s it!
Your external network adapters should now be natively supported in ESXi 6.5, 6.7 or 7.0 run on 10th Generation Intel NUC.
I have tried two different adapters, Belkin F2CU040btBLK USB-C and some very old USB-A 3.0 Adata one – both worked perfectly. I left Belkin plugged in as it’s much newer and 2 weeks after switching to NUC I can confirm that I’ve not had a single network performance issue. My USB-C wired NIC is happily used as a WAN interface by Untangle Firewall VM. Happy days!
Lastly, if you need Intel NUC 10th Gen ESXi image without having PhD in VMware PowerCLI and Google, give us a shout and we will share the image, hopefully saving you some time!
Tons of love,
WiFi Ninjas x