


Let’s face the truth. We can’t avoid dev stuff in WiFi forever! REST API, Python, JSON, Ansible and whatever else is needed – here we come!
It’s time. This is day 1 of our studies!
The mission for today? Actually we have a few 🙂
- Prepare the environment to work with Mist REST API using Postman
- List all WLANs created in WiFi Ninjas site using Mist API using GET
- Narrow the list down to a specific WLAN – “WiFiNinjas(.)(.)”
- Rename “WiFiNinjas(.)(.)” WLAN to “WiFiNinjasTitties” using PUT
Extreeeemely complicated, we know 😉
Let’s assume everyone knows what the API is. In case it’s not the case, here is a quick read:
https://www.howtogeek.com/343877/what-is-an-api/
Mist (and most other Enterprise solutions) use REST:
Lastly, from Mist Documentation:
https://www.mist.com/documentation/category/api/
Steps to complete our little task below!
Install Postman
You can get it here:
https://www.getpostman.com/downloads/
Generate Token
Token is needed so the Mist Dash can authorize us to access API.
Log into Mist Dash, then go to and hit ‘POST’:
https://api.mist.com/api/v1/self/apitokens


If you hit ‘POST’ again, new token will be generated!
Take note of the “key” – it’s our token.
Let’s assume we want to list created WLANs in the test ‘WiFi Ninjas’ site.
Check API URL to list Site WLANs
Mist API is nicely documented. You can go to Mist API documentation page to check the URL for everything that’s possible using RESTful API:
https://api.mist.com/api/v1/docs/Home


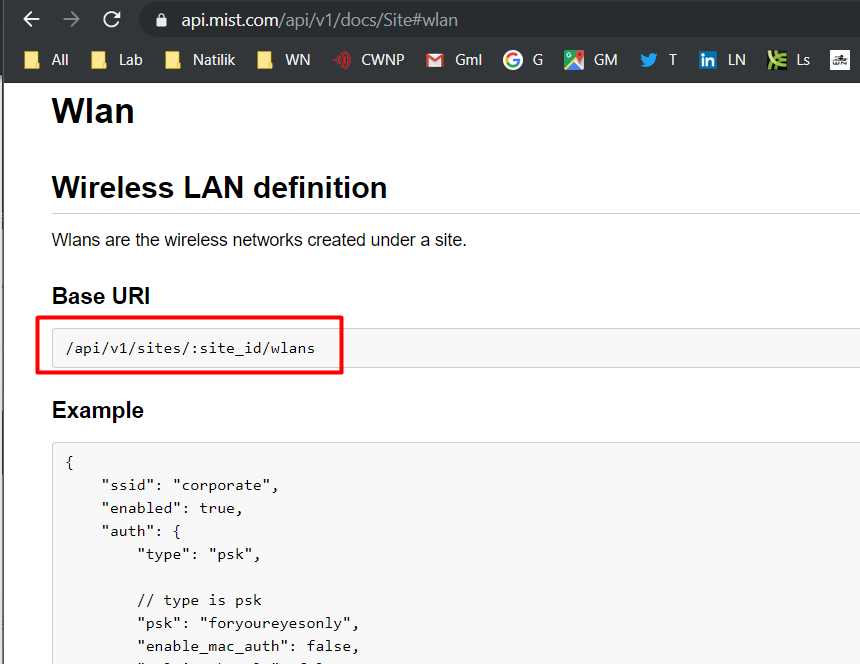
We now know the syntax to get our WLANs.
Get Org ID and Site ID
Next we need to know the “WiFi Ninjas” Site ID to check against.
Go to Mist Dash. You can get Org ID and Site ID from the browser URL:


We now have everything we need to list our WLANs in ‘WiFi Ninjas’ site!
Use obtained API token, WLAN GET URL and Site ID to list the WLANs
- Create new GET Request by hitting ‘+‘
- Type https://api.mist.com//api/v1/sites/<siteID>/wlans into request URL
- Ensure to include https:// prefix!
- Go to ‘Headers‘ tab and specify (type in) Authorization (use Token obtained in previous steps in VALUE fields; ensure to include key word ‘Token ‘ before pasting in the actual token!) and Content-Type (type ‘application/json’ in VALUE field)
- Hit ‘SEND‘

![O Postman
File Edit View
Q Filter
History
Help
Import
Collections
Runner
APIs BETA
Clear all
My Workspace •
Invite
NO Environment
GET https•.//api.mist.com//api/vl/sit.., •
Untitled Request
(D Save Responses
Today
https://api.mist.com//ag
O GET 98886fb1c48ef.b905-8 +
4/"' lans
May 8
Params
Authorization
upgrade
Save
Cookies Code
presets
Headers (2)
Authorization
Content-Type
Key
Temporary Headers (7) O
Body Cookies Headers ( 1 6)
Headers (9)
Test Results
Visualize
Body Pre-request Script
Tests
VALUE
Token UTEmqoKcpxImnGodssHzozcn8Sk7PCcm.
application/json
Value
status: 2000K
DESCRIPTION
Description
Time: 673ms
Bulk Edit
Size: 8.45 KB
Save Response
Pretty Raw
Preview
"class": "best effort",
"over"Arite": false
"org_id": "d2b94bf9-22be-4af1-aød1-68e162fbe199",
"dtim": 2,
"hide 55id": false,
"acct_servers": t],
"created time": 1557492085,
"disable_uapsd": false,
"allow mdns": false,
"apply_to"• "site",
"app_limit": {
"enabled": false,
"apps" •
"wxtag_id5": O
: "a88d6cdd-6aaS-4eb2-8cd9-fb8731ab18e2" ,
"vlan id": 20,
"wxtag_ids": null,
"SSI t"
v an_poo Ing :
"wlan limit dcmn": 2øøøe,
"wxtunnel id": null,
"auth serwers nas id": "
false,
"site id •
". "efc98886-fb1c-48ef-b9ø5-81920edS7dS4",
"disable Hmm": false,
"airwatch": {
"username" .
"api_key"• " ,
"console url": "
"password" • "
"enabled": false
"schedule": {](https://i0.wp.com/wifininjas.net/wp-content/uploads/2019/11/WNB018-05.png?fit=1024%2C1012&ssl=1)
Note the “id” of “WiFiNinjas(.)(.)” WLAN

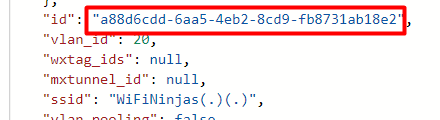
Copy WLAN “id” to our GET URL


We should now see the details of just “WiFiNinjas(.)(.)” WLAN.
PS. We love that (.)(.) suffix!
Change WLAN name
Let’s rename “WiFiNinjas(.)(.)” to “WiFiNinjasTitties”! 🙂
Since we’re changing WLAN config, we’ll use PUT this time.
Change request type to PUT, go to “Body” tab, ensure “JSON” type is selected and write down lines that you want changed between curly brackets.
Note, that there is no comma at the end of the line.


You can now refresh your Mist Dash or GET the WLAN info via API to check if the name was changed.


Worked like charm! 🙂
What’s Next?
Finally, we can use Postman to translate our actions into code (we’ll stick to Python), that can be used in scripts.


That’s it!
We have successfully listed all Mist WLANs, then narrowed it down to one WLAN and finally we’ve changed the name of that WLAN. All with REST API GET and PUT requests – how cool!
With love,
WiFi Ninjas x