

Hey!
Welcome to our very first blog on our journey to learn some coding.
I decided it was finally time to stop burying my head in the sand & to make a start with taking a dive into the world of coding.
This is my very first time trying to properly understand what is required to even make a start with learning how to code – so disclaimer, this is going to be a very simple first step into Python coding.
If like me you didn’t even know where to start, what version of Python to go with, what you need to write your first piece of code, any apps required, what training material should I look at first – then this blog is probably for you as I will take you through everything I have done to write my first piece of very simple Python code.
If you already have even an intermediate level of coding or Python knowledge – then this blog probably is not for you but you are welcome to read on anyway and if you have any useful feedback for anyone else about to embark on their first journey into coding, please feel free to leave some comments below.
Let’s start with what training material I have decided to go with. I reached out to a few people that I knew who was pretty good with coding for what they would recommend as a starting point. I will list out a few of the recommendations:
I took a look at all these options and they all seemed like a great place to start but I have decided to go with the Kirk Byers “learn Python Course” – you sign up to the course on his website and then when the course starts each week he will email you about an hours’ worth of videos to watch along with some exercises. Kirk comes from a networking background so even from the very beginning when he is teaching you the Python basics – it is still cantered around networking which I like.
Moving on to which version of Python do I start to learn – version 2 or version 3? Great question I didn’t know either, so I reached out to some guys & they all said well it depends on your environment but if you are making a start now its probably best just to jump straight in with version 3. The way it was explained is that Python v2 is kind of like IPV4 & Python v3 is IPV6 – there will still be support for v2 till the end of 2020, but everything is moving towards v3.
Ok so now I made my decision to go with Python v3 you need to install Python on your device. You can download here:
Python Download: https://www.python.org/downloads/
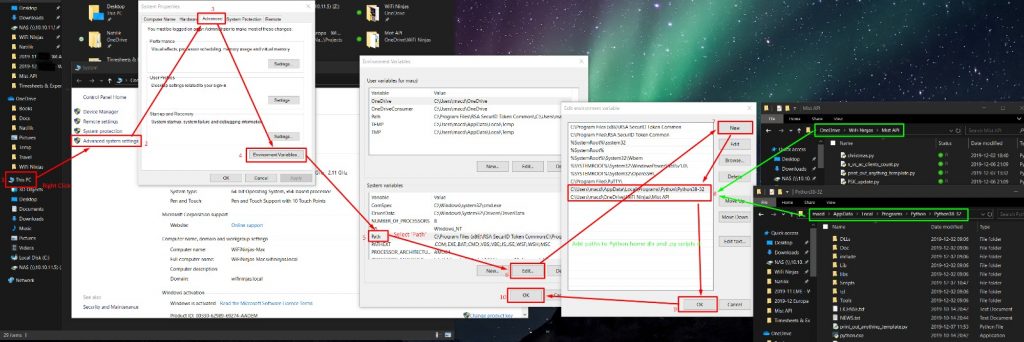
If you are downloading Python for the first time, make sure when you are going through the installer you check the box “Add Python to PATH”.

If you already have Python installed here are the steps to add Python to PATH:
Steps:
After you have downloaded the version of Python relevant to your operating system we now need to install some sort of tool/ application to use to write our Python code. There are quite a few out there such but the one that I have gone with and seems to be quite popular is an application called ATOM. You can download ATOM from here:
ATOM download: https://atom.io/
Once you have installed ATOM on your device, you can install additional packages & themes to make ATOM more relevant for what you are coding. I found some recommendations online for some packages to use on ATOM specifically for Python coding which I will share with you guys what I have installed – I will be totally honest I am not 100% sure what all of them do but some are pretty self-explanatory.
There was also a recommendation to use the “Predawn” theme which styles the text in ATOM in a certain way that might make it easier for you to understand different aspects of the code.
Now that we have Python v3 installed and ATOM + the additional packages for an application to use to write Python code it was time to get started!
In ATOM your first line of code needs to be a “shebang” line (not sure if I have got that correct but it certainly sounded like shebang so I am going with it!). This tells your computer that you want Python to execute this program. The shebang line begins with #! but the rest depends on your operating system. I am using a Windows laptop, so my shebang line is:
Windows shebang line: #!/usr/bin/env python3
My very first piece of code was going to a super simple one where I wrote some “strings” where a user would then input some text & then that text would be “printed” out.
Staying on the networking theme I went with some basic IP information. Here is the code that I had written in ATOM:

The “ip_addr” “sub_mask” & “def_gw” are my strings and the “= input” means that is what will be seen & what a user types into here are what will the be printed which is called out from the “print” lines. I saved this piece of code as “test1.py” in my one drive.
Now I wanted to run this piece of Python code that I had written on my laptop, you can do this directly from your Windows command prompt. When you launch the command prompt you will need to change the directory first, so it knows where to execute the Python code from. As my file was in my one drive this was the command line that I needed to enter.
Change directory: “cd C:\Users\mstarling\OneDrive\Python\Python Files”
Once the directory has been changed you can then execute your Python file by using this command.
Execute Python command: “python ./test1.py”
Which should look something like this:
![:estl .py — Files — Atom
Edit View Selection Find Packages eelp
test2.py
Python Files
testl. py
test2.py
2
4
6
7
8
S! python3
ipßidr = input("Enter a IP addres: ")
sub_mask = a Subnet Mask: ")
def_gw = Input("Enter a Default Gateway: ")
print(ip_addr)
print(sub_mask)
print(def_gw)
icrosoft Windows [Version 18.8.17134.1138]
(c) 2818 microsoft Corporation. All rights reserved .
: \Users\mstar1ing d C: Files
Users mstarlin OneDrive P hon P hon Files python . /testl . py
Enter a IP addres: 18.18.18.18
Enter a subnet mask: 255.255.255.8
Enter a Default Gatewa
. 18.18.18.1
18.18.18.18
255.255 . 255.8
18.18.18.1
: \Users\mstar1ing\OneDrive\Python\Python Files>_](https://wifininjas.net/wp-content/uploads/2019/12/ATOM-CMD-1.png)
We can see here the code in ATOM, then changing the directory in my windows command prompt, then executing the Python file & I then entered some IP-SM-DG info which then got printed out! I know this is a super simple piece of code but within 1 hour of watching my first Python training videos, I was able to install everything I needed, write my first piece of code & then execute it – which I found very exciting!
I then wrote another piece of simple code which was a little bit more relating to us 😀
![thon\Pythcn Files — Atom
2
4
testl.py
Welcome
podcast = input("Enter your favourite wireless networking podcasters: ")
prmt(podcast)
icrosoft windows [Version 18.8.17134.1138]
(c) 2818 microsoft Corporation. All rights reserved .
: \Users\mstar1ing>cd C: \Users\mstar1ing\OneDrive\Python\Python Files
Enter our favourite wireless networkin
IFI Ninjas
dcasters: WiFi Nin •as
: \Users\mstar1ing\OneDrive\Python\Python Files>_](https://wifininjas.net/wp-content/uploads/2019/12/ATOM-CMD-2.png)
What you can see here is you could get creative with any kind of info you wanted to input here.
There you go guys, all the first steps that it took to get me off the ground and running with Python coding. Our aim is to really push on & learn as much as possible over the next year with coding & automation so we will do our best to keep you updated along our journey with anything we think might be useful to help you guys.
I hope you enjoyed the blog & I would recommend anyone thinking about taking the plunge into making a stat with learning to code to do it – as I strongly believe that going forward as a network engineer we will really be required to have at least some knowledge and coding skills as well.
Thanks!
X