WN Blog 006 – Cisco Catalyst 9800 – Deployment with VMware ESXi
6min read
If you are geeky, crazy or just curious to try out first generation of
Cisco products, new Catalyst 9800 Wireless LAN Controller, this guide might be
useful to you 🙂
Jokes aside, C9800 feels like a solid product that is quickly gaining
trust of wifi pros and gains traction in the enterprises.
It is a spiritual successor to Cisco AireOS WLCs that sits on the well
known IOS-XE that everyone knows and loves :] Thankfully, it has nothing to do
with Converged Access, that also was IOS-XE based.
C9800 code was re-written from scratch and offers almost full features parity with its AireOS counterpart.
It’s quite flexible too, meaning you can install it in a private cloud
(VMware etc.) public cloud or use it as an on-prem appliance sitting on a
switch or a standalone box. All versions offer exact same functionality (with
some obvious limitations, like no central data switching when used in public
cloud), so you really just need to decide what’s easiest for you to deploy and
integrate and think about scale.
I thought that creating an with easy-to-follow ESXi installation steps
guide would be a great start!
First of all, here is my lab environment:
Lab Environment
And installation steps below:
1. Download the WLC image
At the time of updating this post Gibraltar-16.11.1c(ED) is the latest TAC recommended version
2.Prepare VMware networking
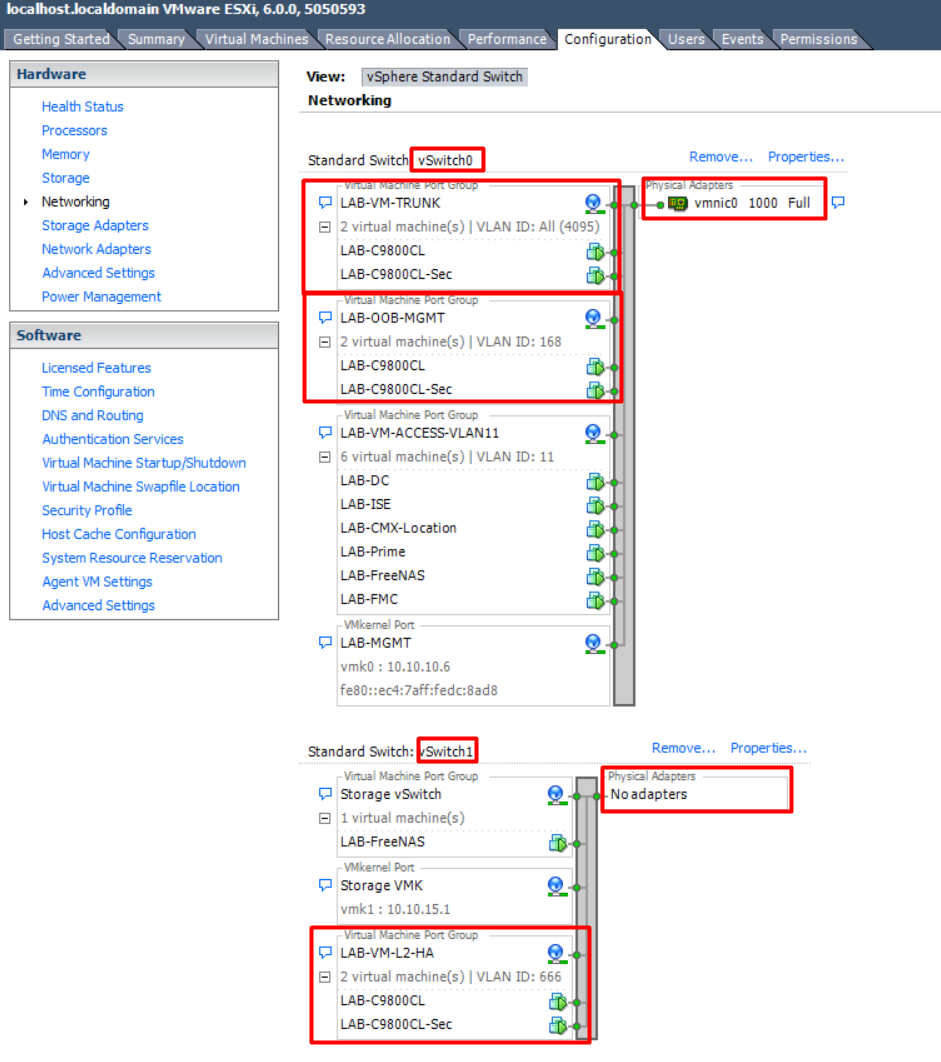
C9800-CL requires 3 interfaces – make sure to have all the required VLANs / subnets ready!
OOB Mgmt. – not used in Cloud (VM) WLC version, but must be assigned to a vSwitch to bring the interface up
Mgmt. – used to manage the WLC and for APs registration. We’re using ESXi 6.0 here, so we have to enable either all 4095 VLANs (trunk) or just one specific VLAN (access). In newer ESXi versions it is possible to allow just selected VLANs on the VMware Distributed Switch trunk. So here we’ll allow all VLANs.
HA (L2) – used for HA/SSO and must be configured even when used in a standalone deployment
It is important to put C9800 interface that we intend to use as a Redundancy Port L2 HA inter-vWLC link into a seperate, unused VLAN! Note that ‘LAB-VM-L2-HA’ Port Group sits in VLAN 666. Only my two vWLCs’ HA RP ports will be put into that group.
ESXi vSwitches Configuration
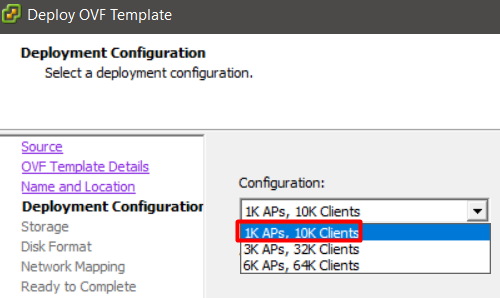
3. Spin the OVA file
Choose the right size (I used smallest – 1k APs)
VM Size
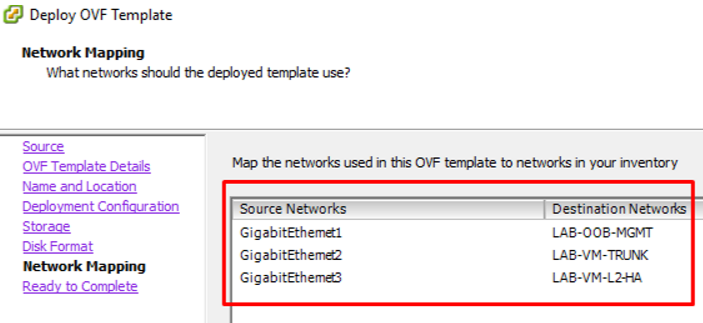
4. Map WLC interfaces to VM networking
WLC Gigabit 1 -> OOB
WLC Gigabit 2 -> Mgmt.
WLC Gigabit 3 -> HA between WLC VMs
WLC to OVF Template Network Mapping
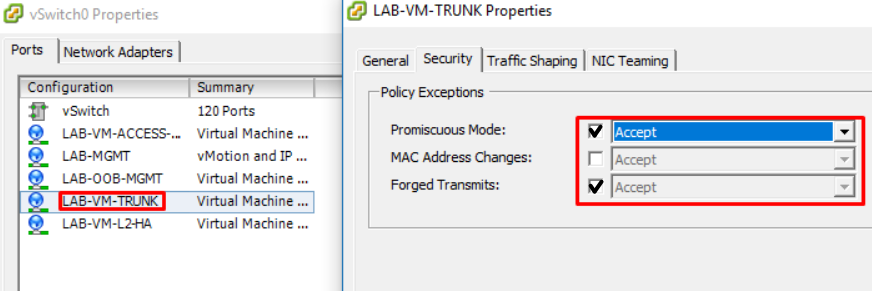
5. Set correct security parameters on the WLC Trunk interface
Promiscuous mode must be set to accept, otherwise tagged traffic won’t flow correctly! This step is easy to miss but it’s very important – WLC won’t pass traffic without ticking it 🙂 The C9800 uses multiple MAC address on the same VM, e.g. may be used by the SVI for wireless management (if bridge for centralised clients) or other SVI’s for loopback, etc., all of which will use different MAC address other that the one assigned to the vNIC of the VM.
Forged Transmits must also be set to accept, as having Forged Transmits set to reject will result in no connectivity due to host verifying the source MAC address which is transmitted by guest OS to match with the MAC address of the VM adapter. As this won’t match for C9800 instance, the ESXi host would drop the packet.
VM Trunk Promiscuous Mode and Forged Transmits
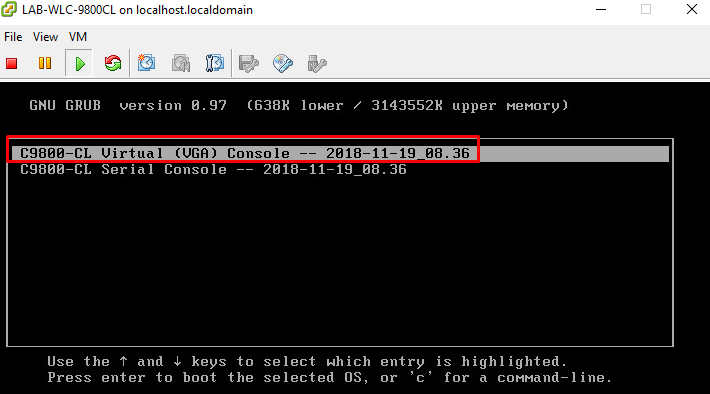
6. Boot the WLC using Virtual Console
The system will install, reboot, check if bootloader upgrade is needed, apply the config (empty at this point), etc. After few minutes, we should be presented with a familiar CLI.
Boot using Virtual Console
7. Terminate the configuration wizard
Would you like to enter the initial configuration dialog? [yes/no]: no
Would you like to terminate autoinstall? [yes]: yes
10. Configure the VLAN for wireless management interface
LAB-C9800CL(config)# vlan 11
LAB-C9800CL(config-vlan)# name wireless_management
11. Configure the SVI for wireless management interface
LAB-C9800CL(config)# interface vlan 11
LAB-C9800CL(config-if)# ip address 10.10.11.35 255.255.255.0
LAB-C9800CL(config-if)# no shut
12. Configure management interface
Note: since G1 is OOB, G2 is Mgmt. And G3 is HA in this VM, we’ll first configure G2 to access management plane of the WLC. All SSIDs I’m planning to use will leverage FlexConnect Local Switching (dropping data plane directly onto the switch on the AP level), therefore we don’t need to allow any other VLANs than 11 on this trunk.Still, we might want to test Central Switching, so let’s allow Wireless Users VLAN 20 (configured in later blogs) too:
Note: depending on your vSwitch configuration, you might need to tag management traffic on the controller side by adding “switchport trunk native vlan 11” command into the config above.
13. Configure a default route (or a more specific route) to reach the device
LAB-C9800CL(config)# ip route 0.0.0.0 0.0.0.0 10.10.11.1
At this point WLC9800 Mgmt. interface should be pingable 🙂
Note: you might need to shut / no shut int g2 and shut / no shut int vlan 11 for the SVI to come up!
14. Configure country code
Note: wireless network needs to be disabled first. Country code
configuration forces GUI to skip the DAY 0 flow as the C9800 needs a country
code to be operational. You can enter up to a maximum of 20 countries.
LAB-C9800CL(config)# ap dot11 5ghz shutdown
Disabling the 802.11a network may strand mesh APs.
Are you sure you want to continue? (y/n)[y]: y
LAB-C9800CL(config)# ap dot11 24ghz shutdown
Disabling the 802.11b network may strand mesh APs.
Are you sure you want to continue? (y/n)[y]: y
LAB-C9800CL(config)# ap country GB
Changing country code could reset channel and RRM grouping configuration. If running in RRM One-Time mode, reassign channels after this command. Check customized APs for valid channel values after this command.
Are you sure you want to continue? (y/n)[y]: y
Don’t forget to re-enable the radios 🙂
LAB-C9800CL(config)# no ap dot11 5ghz shutdown
LAB-C9800CL(config)# no ap dot11 24ghz shutdown
Finally, validate all is up and happy:
LAB-C9800CL# show ap dot11 5ghz summary
LAB-C9800CL# show ap dot11 24ghz summary
Validate Radios Operational State
15. Create a certificate for the AP to join the virtual controller
Note: you must specify the interface for the wireless management, create
certificate and verify certificate installation. If you skip the
certificate/trustpoint configuration, APs will not be able to join. However,
you can go to the GUI and configure it by importing the desired certificate.